Baked Fish Fry

baked fish fry
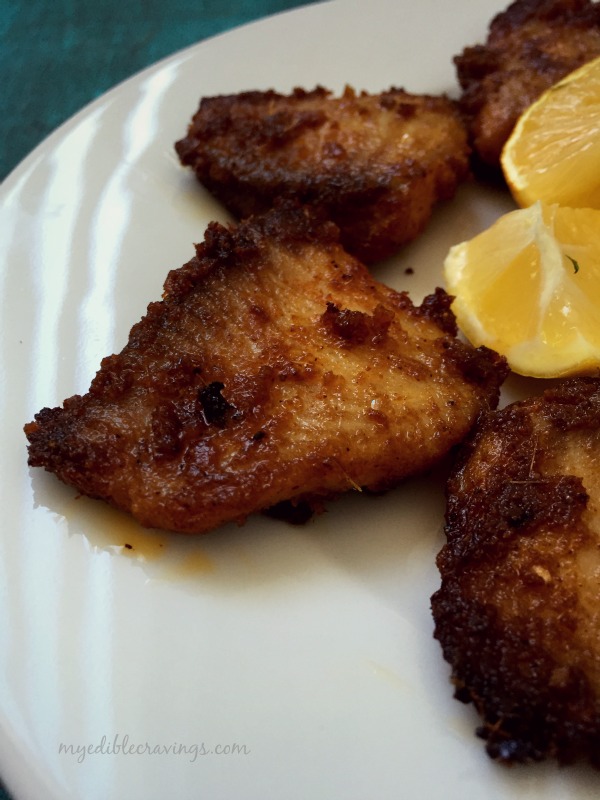
Today I am posting a recipe that is a different take on one of the dishes that I had already posted before. It is one of my most favorite dishes among non vegetarian items and the version I have posted is a healthier alternative to the popular version known to many. it is the baked fish fry. I basically don’t prefer fried foods. So when I came to know of fish fry that can be baked I was stumped. Also baked fish fry can both be had as a snack as well as in a main course.

IMG_0333
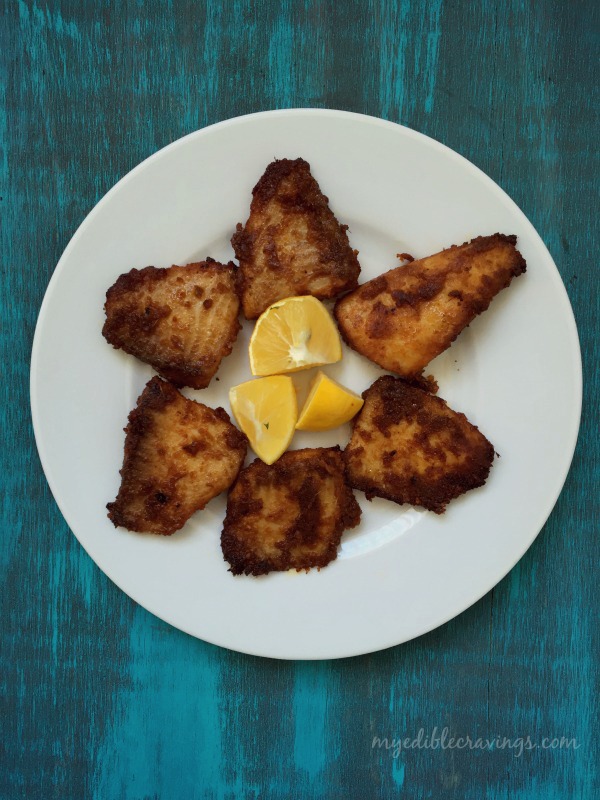
I first had baked fish fry at my friend’s house when we went there for dinner a few months back. I was so hooked to the dish that when we went there again, I personally requested her to prepare the dish while I was there so that I could learn the recipe 🙂 A big shout out to my dear friend 🙂 I love fish and any dish that can be made from fish. And when I learnt of a healthier alternative to frying it was a double bonanza 🙂 Baked fish fry is very easy to make. As with many of the non vegetarian dishes, especially dry varieties, marination is the key here. Beware of the consistency of the marinade. It should not be too thick or too watery. And, as passed down to me from my friend, vinegar is the key to get that tanginess in the fry. Also, make sure to get the marinade infused in the fish as much as possible.

IMG_0330
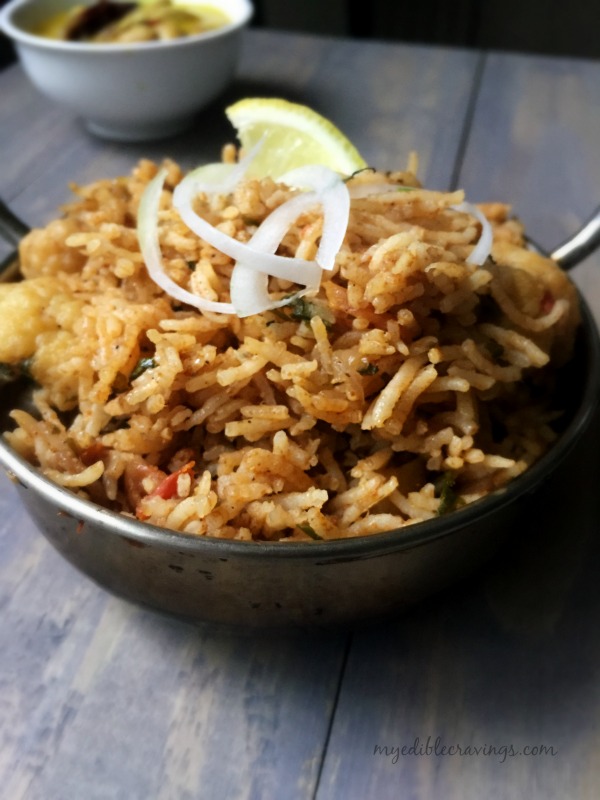
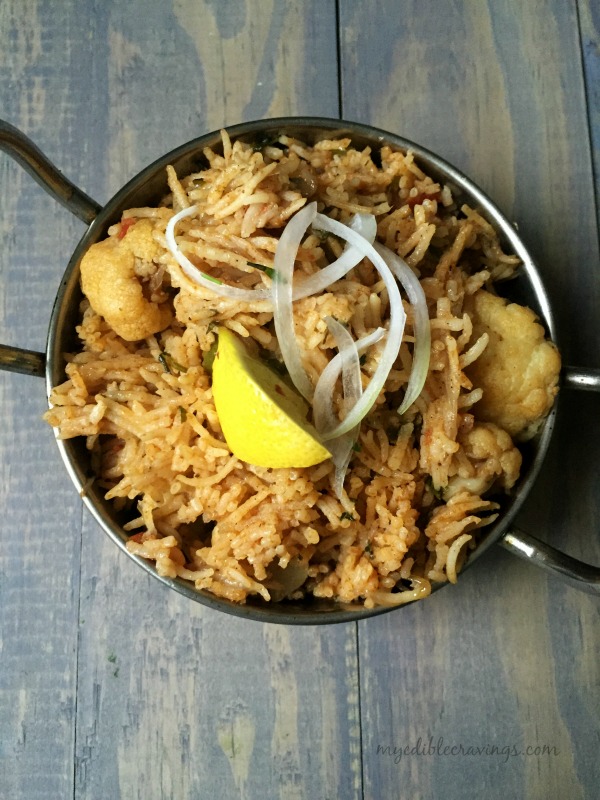
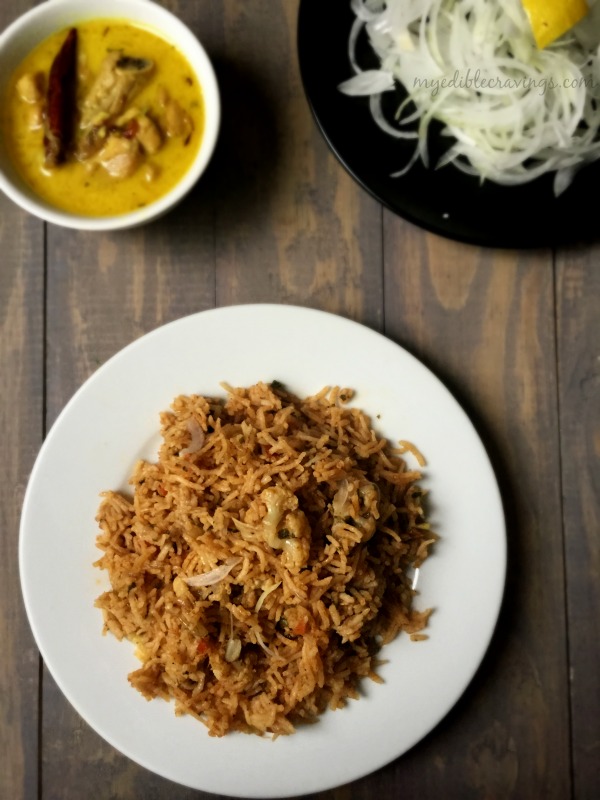
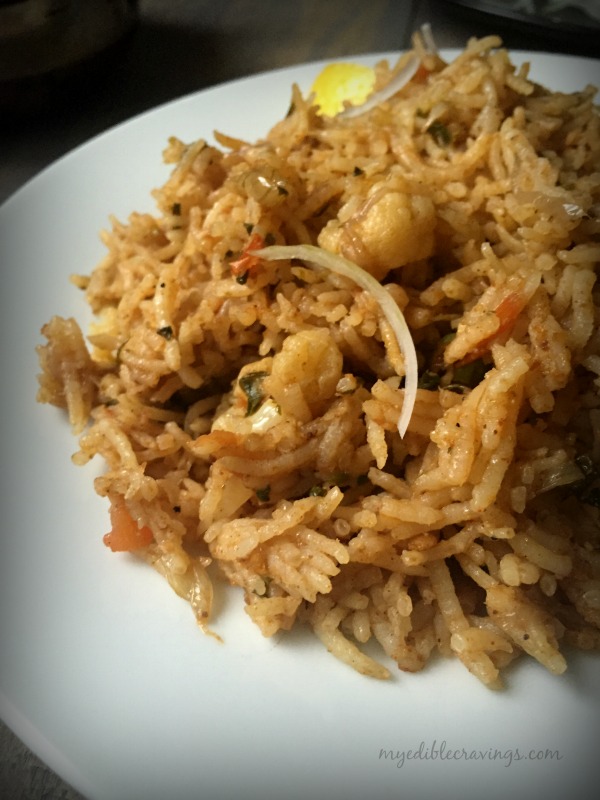
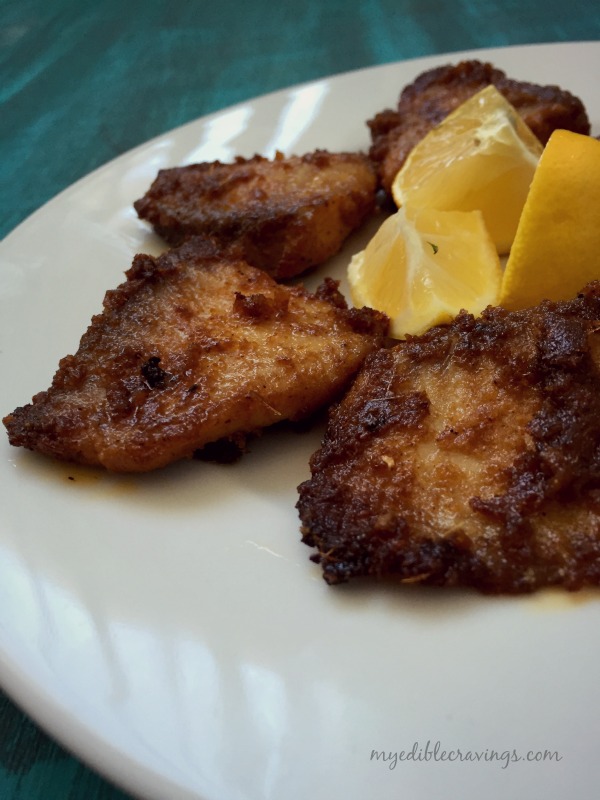
I am planning to post the recipes for fish biriyani and chill fish in the near future and the baked fish fry is the main component in those dishes. Don’t forget to follow my blog for those amazing recipes. In case, you don’t have a conventional oven, you can also shallow fry the fillets instead of baking. BTW, Happy National Chocolate Cake Day. Have you all tried my chocolate cake recipe (which is by far the best dish I had baked in the last year, at least as attested by my friends :)) ?


Baked Fish Fry
Recipe type: Appetizer
Cuisine: Indian
Prep time: 
Cook time: 
Total time: 
Serves: 6 small pieces
 
Ingredients
For the marinade:
  • Ginger garlic paste - 1 tbsp
  • Red chilli powder - 2 tbsp
  • Clove powder - a pinch
  • Cinnamon powder - a pinch
  • Garlic powder - 1 tsp
  • Onion powder - 1 tsp
  • Black pepper powder - ½ tsp
  • White distilled vinegar - 1 tbsp
  • Salt as required
  • Vegetable oil - 1 tbsp
  • Corn flour - 1 ½ tbsp
  • Water - 2 to 4 tbsp
  • Tilapia fillet - 1 ¾ lb
Other ingredients:
  • Lemon – 1 no
  • Curry leaves – a sprig
Instructions
  1. Grind cinnamon and clove separately and make powders of them if you don’t have store bought at home. Make a paste of ginger and garlic and keep it ready.
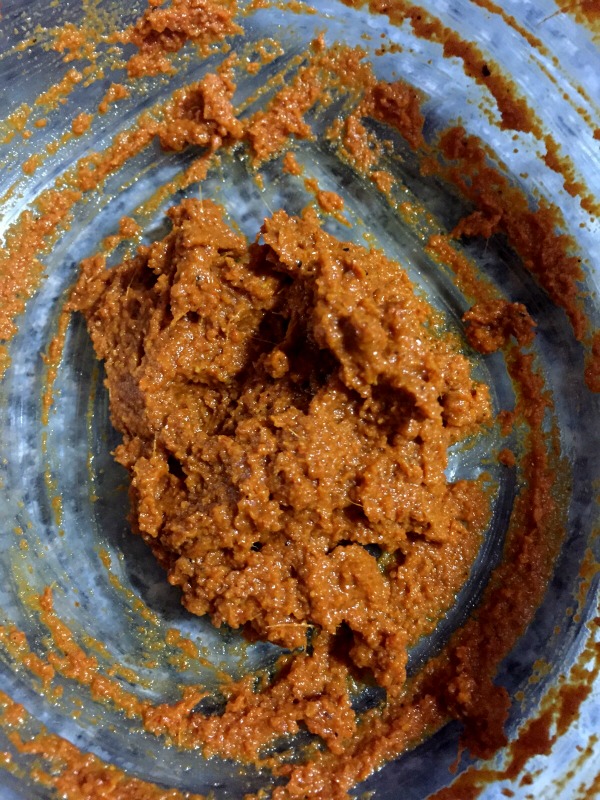
  2. Mix all the above given ingredients under marinade together to a thick paste and check the seasoning. Add extra salt and spice if needed at this stage. Drizzle water at last to get the right consistency – do not add too much water otherwise the marinade won’t stick to the fish while baking.
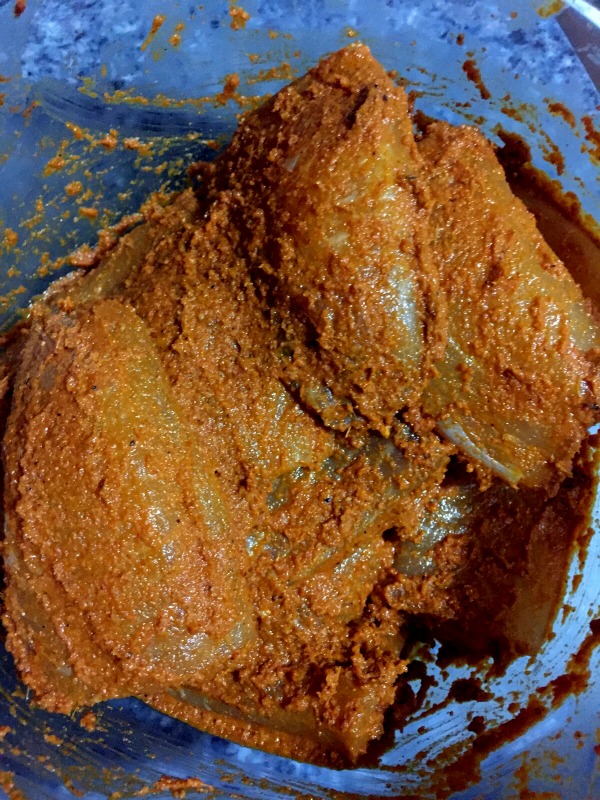
  3. Add the fish fillets to the marinade and give a good massage for at least 20 minutes. Leave it to rest overnight or for at least half an hour.
  4. Pre-heat the oven to 350 degree Fahrenheit. Spray or brush enough olive oil on the aluminum sheet.
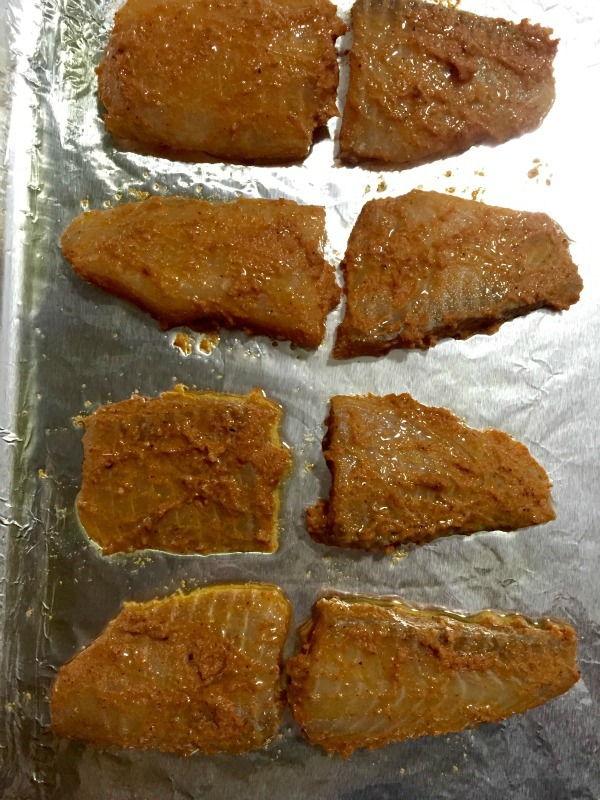
  5. Place the marinated fish fillets on top of the sheet and spray olive oil on them as well. Bake for 5 to 8 minutes.
  6. Flip the fish fillets and spray the other side of the fillets with olive oil and cook for another 5 to 8 minutes.
  7. Set the oven in broiler and bake for couple of minutes more to get the crispiness.
  8. Remove from the oven and enjoy with lemon wedges on the side. You could also season curry leaves and toss them on top of the fish to add extra flavor to the dish.
  9. Enjoy them as is as a snack or have them along with white rice and fish gravy ! 🙂

baked fish

Spicy Bread Toast

Spicy Bread Toast

Bread is a staple food for most of the population in the world. It is one of those food items that you can find anywhere. Irrespective of the country, people or its culture. Also, there are hundreds of varieties to it, from normal white bread to rye, sesame, cauliflower etc. There are countless varieties of dishes that you can prepare from bread. One such variety is the Spicy Bread toast. It is a very simple and tasty dish made from a minimum number of ingredients.

Spicy Bread ToastSpicy Bread ToastSpicy bread toast is made from egg, cilantro, turmeric, pepper, green chillies and ginger garlic paste. It literally takes 15 minutes to prepare this dish, right from preparing the egg mixture to toasting the bread dipped in that mixture. Spicy bread toast is an excellent dish for kids and it’s healthy as well, with the absence of jam or spread to have it being the main reason. It is a pretty heavy (I know, it doesn’t look like it but trust me 🙂 ) dish and breakfast is the right time to have calorie rich food to get you through the day!

Spicy Bread ToastI must give a special shout out to my HB here because he is the one who prepared Spicy bread toast the first time we tried (but I was the one who found the recipe 🙂 ) and it turned out to be excellent. Try this simple and tasty dish and enjoy it for breakfast or dinner.

Spicy Bread Toast
Recipe type: Breakfast
Prep time: 
Cook time: 
Total time: 
Serves: 10 bread slices
 
Ingredients
  • Eggs – 2
  • Milk – ½ cup
  • Salt – ½ tsp or as required
  • Black pepper powder – ¼ tsp
  • Turmeric powder – ¼ tsp
  • Ginger garlic paste – ½ tsp
  • Green chilli, finely chopped – 2 nos
  • Cilantro, finely chopped – 1 tbsp
  • Breads – 10 slices
Instructions
  1. Beat all the above ingredients except bread in a medium bowl and leave it for 30 minutes.
  2. After 30 minutes, cut the edges of the bread slices and cut the breads diagonally.
  3. Heat a flat pan, dip a bread piece into the beaten egg mixture and toast them. Smear very few drops of oil around the toast. Flip them and toast the other side of the bread until golden brown.
  4. Repeat the above step for the rest of the bread pieces. Enjoy the hot and spicy bread toast along with tomato chilli sauce as a snack or breakfast or dinner. 
Notes
1.Leave the beaten egg mixture to rest for at least 20 minutes before making the toast. So that all the ingredients are well set and combined.
2.Carefully cut the sides of the bread without pressing the breads too hard at the center.
3.Dip the bread just for a second and tost them on the pan. Do not dip the bread slices too much or your toast becomes soggy.
4.Same way smear few drops of oil while toasting the bread to avoid sogginess.

Spicy Bread Toast

Coriander Rice


Coriander RiceIt has been quite a while since I had posted a recipe for a rice variety. The recipe that I have posted today is a specialty of my MIL. It is called as the Coriander/Cilantro rice. As the name suggests, the main ingredient here is coriander. It is a very simple and tasty dish.

Coriander RiceCoriander in general has many medicinal properties. It is used for obesity treatment, skin care and is also recommended for diabetic people. So Coriander rice is a healthy dish but you normally don’t find them in restaurant menus (maybe because it is healthy :)).

Coriander RiceOn days when you don’t feel like cooking but still want to have something healthy, Coriander rice is an apt choice. Try this simple and tasty variety rice in your kitchen and let me know what side dish you would prefer with it (I like it with simple potato chips and kadalaiparuppu thogaiyal 🙂 )

Coriander Rice
Prep time: 
Cook time: 
Total time: 
Serves: 2
 
Ingredients
  • Oil – 1 tsp
  • Mustard seeds – ½ tsp
  • Urad dal – ½ tsp
  • Onion, medium, finely chopped – 1 no
  • Ginger garlic paste – 1 tbsp
  • Raw rice – ¾ cup
  • Salt as required
  • Ghee – 1 tsp
to Grind:
  • Coriander leaves or cilantro – a bunch (1 ½ cups tightly packed)
  • Green chillies – 5 nos
  • Chutney:
  • Oil – ½ tsp
  • Asafetida, solid – 1 “
  • Red chilli – 1 no
  • Garlic clove – 1 no
  • Gram dal – 2 tbsp
  • Curry leaves – 4 nos
  • Grated coconut – 1 tsp
  • Salt as required
Instructions
  1. Wash and grind cilantro and green chillies to a fine paste.
  2. Wash and cook the rice adding enough salt to it and set aside.
  3. Heat a pan with little oil and season with mustard and urad dal.
  4. When they start to sizzle add in finely chopped onions. Sauté onions until they turn translucent.
  5. Add in ginger garlic paste and sauté until the raw smell disappears.
  6. Add the ground cilantro paste and stir until the raw smell disappears. Add enough salt and switch off the flame.
  7. Now add the cooked rice to the coriander paste and mix well until all the rice are well coated with the paste.
  8. Drizzle a few drops of ghee and serve hot with kadalai paruppu thogaiyal on the side.
  9. Kadalaparuppu thogaiyal-
  10. Heat a pan and dry roast asafetida for just few seconds. Transfer it to a plate.
  11. Heat the same pan with oil and add red chilli. Sauté until it changes color and transfer it as well to the plate.
  12. Add garlic clove and sauté until it turns translucent and transfer it to the plate.
  13. Add gram dal and sauté until the aroma spreads or until they turn golden brown.
  14. Switch off the flame and add grated coconut, curry leaves and salt.
  15. Grind everything together to a coarse paste by adding very little water.

025

Vegetable Biriyani

Vegetable Biriyani

Vegetable Biriyani is the vegetarian counterpart of the more popular Biriyani, which generally refers to the variety with meat. Back home, during family functions like marriages, baby showers etc we don’t normally serve meat in the menu. But to mark the grandeur of the function we serve vegetable Biriyani as one the dishes.

Vegetable BiriyaniVegetable Biriyani is popular in my home state, Tamilnadu. Honestly, I have not seen it in any other part of India. I would say it is a healthy dish since you add vegetables (English vegetables like carrot, beans, potatoes, peas etc) in abundance. You can also add fried bread pieces and that tastes good too.

Vegetable BiriyaniVegetable BiriyaniThe recipe for Vegetable Biriyani that I have given below does not have coconut milk as one of the ingredients and it tastes just as good as the one with coconut milk added. I have slightly modified Mom’s recipe and have presented it here. Try this tasty and rich Vegetable Biriyani in your home and let me know your experience:)

Vegetable Biriyani
Recipe type: Main
Cuisine: Indian
Prep time: 
Cook time: 
Total time: 
Serves: 4
 
Ingredients
  • Ghee + olive oil - 2 tspn + 2 tbsp
  • Homemade biriyani powder + big bay leaf - 1 tsp + ½
  • Onions, small – 2 nos
  • Freshly ground ginger garlic paste - 1 ¼ tbsp (I used organic garlic from trader’s joe)
  • Big ripe tomatoes - 1 ¼ nos
  • Cauliflower, medium sized potato (cut and soaked in turmeric water) - ½ + ½
  • Green chilli, long, slits - 9 nos
  • Chopped mint and coriander leaves - ½ cup
  • Salt - 1 ¾ spoon
  • Sakthi biriyani powder - ½ tsp
  • Coriander powder – 1 ¼ tsp
  • Homemade sambar powder - ½ spoon
  • Aachi red chilli powder - ¾ tsp
  • Garam masala powder - a generous pinch
  • Water, used to soak rice - 3 cups
  • Basmati rice - 2 cups
For garnishing:
  • Chopped mint and cilantro - 1 tbsp
  • Sakthi biriyani powder - a pinch
  • Ghee - a tsp
Instructions
  1. Wash and soak basmati rice in water for 45 minutes. Drain and save the water.
  2. Chop the vegetables and soak it in turmeric water.
  3. Cut and chop onions, tomatoes, mint and cilantro.
  4. Heat a pressure cooker with ghee and oil. Add biriyani powder and bay leaf.
  5. Increase the flame to medium and add onions. Sauté until they turn translucent. add ginger garlic paste and sauté until raw smell disappears. Add tomatoes and cook for a couple of minutes. When they turn mushy add in the vegetables. Stir for a minute and add in green chillies, chopped mint and cilantro. Stir well for a couple of minutes and add all the masala powders. Mix well and add water. check for salt and bring it to boil. Add the soaked rice and allow them to boil. When the water is ¾ th observed and when you see the rice on top, garnish with mint, cilantro, sakthi biriyani powder and ghee especially on the sides. Cover the lid and dum cook in low flame for 10 minutes.
  6. After 10 minutes open the lid and check if the rice and vegetables are well cooked and all the water is observed.
  7. Serve hot with any raitha of your choice. Enjoy!!! 
Notes
1.Always use freshly ground ginger garlic paste to reach a good taste.
2.You can substitute olive oil with vegetable oil.
3.I tried using organic garlic for this recipe. You could use the regular one.

Vegetable Biriyani

KERALA CHICKEN ROAST

A while ago, I had mentioned about my HB’s attempt at cooking tandoori chicken and the awesome result. Most recently he attempted another variety of chicken called the Kerala Chicken Roast. And again it turned out to be an awesome dish! As the name suggests, Kerala Chicken Roast is a specialty of God’s Own Country and also my neighboring state as well, Kerala. kerala chicken roast Kerala Chicken roast is an easy to cook, spicy yet a tasty dish. It is a dry variety and hence a side dish essentially. The main ingredient in preparing Kerala Chicken Roast is the kerala garam masala. It is different from regular garam masala in the sense that it has the strong fennel seed flavor. And using shallots is must for this dish. You can have Kerala Chicken Roast with almost all main entrees like Rice (with some gravy, or just rasam), parotta, chapati, biriyani etc. kerala chicken roast Back to my HB’s cooking experiments, it is two out of two so far (Tandoori Chicken and Kerala Chicken Roast). Kerala Chicken Roast is a new dish to me and my HB. I have never had it back home but after tasting it for the first time here, I had noted to myself to try it back home in a Kerala-cuisine restaurant. Try this simple and spicy recipe at your home and share your experiences in the comments section below 🙂

KERALA CHICKEN ROAST
Recipe type: Lunch
Cuisine: Indian
Prep time: 
Cook time: 
Total time: 
Serves: 2
 
Ingredients
To marinate:
  • Chicken – 200 grams
  • Red chilli powder – 1 tbsp
  • Coriander powder – 1 tsp
  • Salt – a generous pinch
  • Turmeric powder – ½ tsp
Kerala garam masala:
  • Fennel seeds – 2 tbsp
  • Green cardamom – 5 nos
  • Cloves – ½ tbsp
  • Black pepper corn – 1 tbsp
  • Star anise – 1 no
  • Javetri- ½ no
  • Cinnamon stick – 1 “
  • Nutmeg – a pinch
Other ingredients:
  • Oil – 2 tbsp
  • Cumin seeds – 1 tsp
  • Shallots – 6 nos, cut into slits
  • Curry leaves – a sprig , divided
  • Ginger garlic paste – 1 tbsp
  • Kerala garam masala – 1 tbsp
  • Whole green chillies – 5 nos
  • Freshly ground pepper – ½ tbsp
  • Salt as required
  • Cilantro – for garnishing
Instructions
  1. Wash and marinate the chicken with the above given ingredients for at least two hours.
  2. Dry roast the garam masala ingredients for a minute, allow it to cool, blend into powder.
  3. Heat oil in a pan and add cumin seeds. When it starts to sizzle add shallots and few curry leaves. Sauté for a minute.
  4. Add the marinated chicken and sauté well. close the lid and cook until the chicken is half done.
  5. Add the kerala garam masala and salt and give it a stir.
  6. Add whole green chillies and sauté until all the water is well absorbed and oil ooze out from the chicken.
  7. Now add in the remaining curry leaves and freshly crushed pepper. Sauté for a minute and switch off the flame.
  8. Garnish with chopped cilantro. Enjoy with hot rice or Indian flat breads!

kerala chicken roast

KOTHU CHILLI DOSA

Kothu chilli dosa
Tired of having the same old idli and dosa? Worried about what chutney to make for dosa or idli? Worry not, kothu chilli dosa will save the day. Kothu chilli dosa is a variety of dosa made with regular dosa and masala.
007
I came across kothu chilli dosa recipe on the internet and was intrigued by it. Naturally, I tried it right away and it turned out to be awesome. Kothu chilli dosa is easy to make and most importantly does not require any sort of accompaniment, like chutney or sambar to it. Also, for health conscious folks out there, you can customize your masala with vegetables like broccoli or zucchini instead of potato.
Kothu chilli dosa
Kothu chilli dosa can be made using regular dosa batter or a substitute that consists of gram flour. I personally prefer dosa batter and the recipe below uses the same. Having shredded kothu chilli dosa with onions sprinkled over is a taste that you should try at least once 🙂
And without further delay, here is the recipe for the wonderful kothu chilli dosa.

5.0 from 1 reviews
KOTHU CHILLI DOSA
Recipe type: Dinner
Cuisine: Indian
Prep time: 
Cook time: 
Total time: 
Serves: 2
 
Ingredients
  • Dosas (preferably uthapam) – 5
  • Oil – 3 tbsp
  • Onion, chopped – 1 no , divided
  • Ginger- Garlic paste – 1 tbsp
  • Tomato, medium size, chopped – 1 no
  • Green chilli, chopped – 2 nos
  • Coriander powder – 1 tbsp
  • Red chilli powder – 1 tbsp
  • Cumin powder – ½ tsp
  • Turmeric powder – ½ tsp
  • Lemon juice – 1 tbsp
  • Salt as required
  • Cilantro , chopped – 5 tbsp
Instructions
  1. Shred the dosas to desired size pieces and keep it aside.
  2. Heat a pan with oil and add onions. Sauté until they turn translucent - Add enough oil so that you don’t have to add water later on.
  3. Add in ginger – garlic paste and sauté until the raw aroma disappears. Now add the chopped green chillies and cilantro. Give it a stir and add tomatoes.
  4. Reduce the flame and cook the tomatoes well (without any chunks). Add all the powders and give a quick stir. Cook until the oil ooze out – Do not add water.
  5. Finally add in the shredded dosa pieces to the tomato sauce and give it a stir. Switch off the flame when the dosas are well blended with the tomato sauce. Garnish with chopped cilantro.
  6. Sprinkle few drops of lemon juice and onions on top and serve it hot. Enjoy!
Notes
1.Add enough oil in the beginning so that you don’t have to add water later on.
2.Having the kothu chilli dosa with onions adds more taste to this dish.

Kothu chilli dosa

DRUMSTICK TANDOORI CHICKEN

There are certain events that happen very rarely in your life and my HB cooking is certainly one of those. And boy does he cook! The other day he tried his hand in the kitchen and the end product was a delicious tandoori chicken!
DRUMSTICK TANDOORI CHICKENTandoori chicken is a very famous chicken dish from north India. All restaurants in the US have tandoori chicken in their menu and is well known among Americans.
DRUMSTICK TANDOORI CHICKENIn fact, there are so many tandoori chicken recipes out there posted by Americans in the internet. Tandoori chicken is one of the healthiest chicken recipes since it does not involve too much oil (oil is added only at the end of preparation).
DRUMSTICK TANDOORI CHICKENMy HB’s recipe is an adaption of VareVah chef’s recipe. It is very simple and easy to make. One main advantage of this recipe is that you don’t have to marinate the chicken for hours like in other chicken recipes. Do try it in your home and let me know your experiences 🙂

DRUMSTICK TANDOORI CHICKEN
Recipe type: Lunch
Cuisine: Indian
Prep time: 
Cook time: 
Total time: 
Serves: 3
 
Ingredients
  • Drumstick chicken – 2
  • Red chilli powder – 1 to 2 tbsp
  • Salt as required
  • Lemon juice – 4 tbsp
  • Curd - 2 tbsp
  • Ginger garlic paste - tbsp
  • Pepper powder – ½ tsp
  • Garam masala powder – ½ tsp
  • Turmeric powder – ½ tsp
  • Cumin powder – ½ tsp
  • Coriander powder – 1 tbsp
  • Dry fenugreek leaves (kasthoori methi) – 1 tbsp
  • Cooking oil/ spray
Instructions
  1. Wash the drumstick chicken thoroughly in running water and dab it with tissue/towel. Make few gashes in the chicken
  2. Mix a tbsp of red chilli powder, a tsp of salt and lemon juice and make it in to a paste. Rub this paste on chicken and make sure it is well applied on the cuts that had made on the chicken.
  3. Preheat the oven to 420 °F.
  4. Mix yogurt, ginger-garlic paste, chilli powder, half a tsp each of salt, pepper powder , kasthoori methi leaves(crushed with your palms), garam masala, turmeric powder, cumin powder, a tbsp of coriander powder and 2 tbsp of lime juice and make a thick paste without any lumps. Add red color to the marination (always mix food color with little water and add to your dish).
  5. Place the marinated chicken on the tandoori pan, spray cooking oil on top of the chicken and cook for 20 minutes. Remove the pan, turn over the chicken and brush them with little oil on top. Cook for another 10 minutes.
Notes
Try to use thick yogurt for marination in order to get thick marinade.